Knowing how to isolate or compartmentalize different parts of the swing is important. This allows you to measure any changes that are/have been made and also helps isolate a part of the swing to make it easier to comprehend and learn. If you can learn and compartmentalize these areas, then layer them on top of one another (essentially chunking them together) the whole thing is easier to learn. The long and the short of it is this, there are 10 positions widely used in the teaching world as a way of measuring the effectiveness of a golf swing. The shorthand for these positions are P1 through P10. This page details these 10 positions using the side and back views of Rory McIlroy’s swing to illustrate each position. Follow along below at each step to see why Rory compresses his iron shots so well and hits drives well over 300 yards. Since Rory is right handed, his lead arm is his left arm and his trail arm is his right arm. This is the opposite for left hand players. I do my best to explain this for each position.
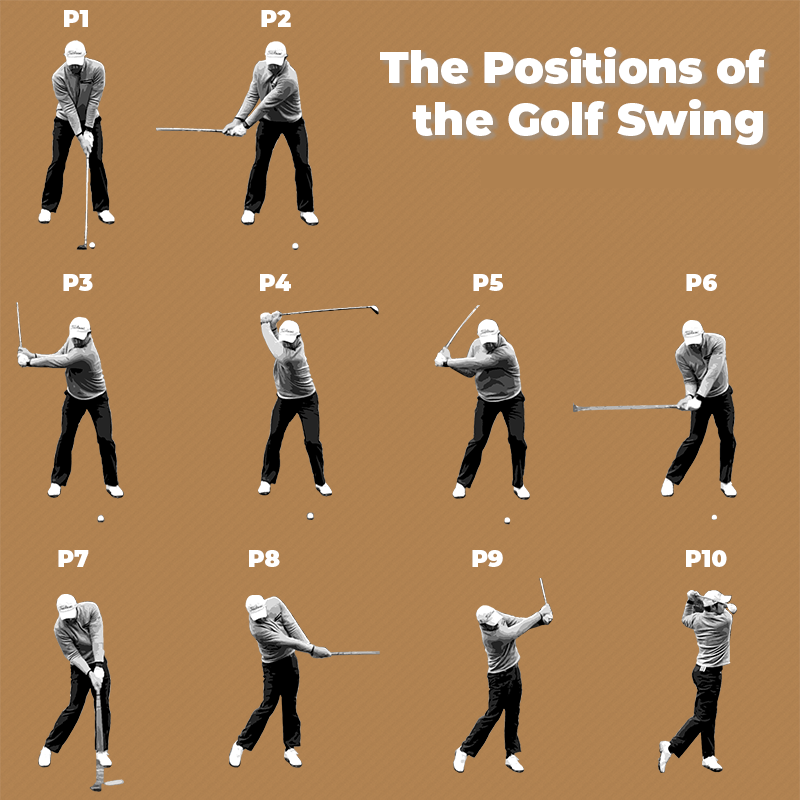
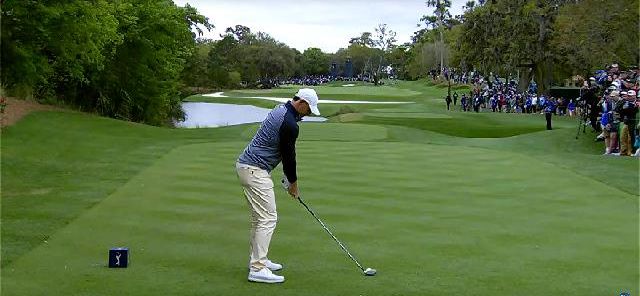
P1: Address
- Feet shoulder width apart with lead foot slightly flared
- Head slightly behind the ball
- Right (trail) shoulder lower than left
- Hands positioned forward off the left (lead ) thigh
- Knees slightly bent
- Back reasonably straight
- Weight on balls of feet
- Arms hanging straight down from shoulders
- Hands relaxed and a 4 or 5 inches from body
Pros spend quite a bit of time and effort in getting the address correct. Shoulders and feet are square and aligned left and parallel to target. Flaring the left foot and maintaining foot width at appropriately shoulder width apart promotes better turn and hip rotation so that hips clear during the through swing.
P2: Coordinated Takeaway
The coordinated takeaway starts at address and continues until the club shaft is parallel to the ground. The adjective “coordinated” describes the synchronized movement of the arms, shoulders, hips, and knees during this movement. That is, these parts all move together and in sync, where one body part does not “take over” or advance further than another.
Amateurs often make the mistake of stalling out other body parts, thus letting the arms take over and “rotate open” and “pull” the club head with just their arms behind the body. In Rory’s case, however, the club face remains slightly shut and in front of body, and all other body parts move in sync. The P2 position is reached when the club shaft is parallel to the ground; also known as the “first parallel”.
Here are some things to look at during this movement to attain the P2 position:
- Arms, shoulders, hips, and knees move together in unison
- Both the left (lead) and right (trail) arms remain straight and extended far from the body
- Left (lead) shoulder moves down, right (trail) shoulder up
- Butt end of club points at target
- The right (trail) palm point more down toward ground
- The club head remains closed and parallel to spine angle
- Head remains centered
Warning!! Very often during this move, with beginning players many of the body parts, mainly the trail knee, trail hip, and the head will “slide” away from the target. They will also “feel” their weight shifting to the outside of their trail foot.
The key to prevent all this from happening is to “push” the right (trail) hip backwards, flex the lead knee a bit more under the body, and let your left (lead) side flex more toward the target. This is called flexion.
Sometimes it helps at setup to place 60% of your weight on your lead side and 40% on your trail side. If all goes well, you’ll remain as centered as Rory is in the P2 position, and your weight will remain on the inside of your trail foot.
P3: Lead Arm Parallel to Ground
The coordinated takeaway continues into the coordinated back swing. Arms, shoulders, hips, and knees continue to move in unison around the spine during this movement. The P3 position is reached when the arms are parallel to the ground.
Here are some things to look at during this movement to attain the P3 position:
- Arms, shoulders, hips, and knees continue to move together in unison
- The left (lead) arm remains straight and stays extended far from the body
- The right (trail) arm begins to fol, but just a little
- Left (lead) shoulder moves down, points just outside the golf ball, and has turned 90 degrees
- Butt end of club points just outside the golf ball as well and the shaft of the club is parallel to the shoulders
- Lead knee has flexed slightly under the body
- The (right) trail hip has rotated back behind the body
- Head remains centered
- Wrists not yet broken
P4: Top of Back Swing
The coordinated back swing is complete when the P4 position is reached. Arms, shoulders, hips, and knees have continued to move in unison around the spine during this movement. The P4 position is reached when the club shaft is parallel to the ground.
Here are some things to look at during this movement to attain the P4 position:
- The right (trail) wrist has broken and is fully supinated
- The left (lead) wrist is pronated
- Arms continue to be far from body with the trail (right) side of body fully extended
- Left (lead) shoulder points just outside the golf ball and has turned greater than 90 degrees
- Shaft and club head point at the target
- Lead knee continues to flexed slightly under the body
- The (right) trail hip has rotated back behind the body
- Head remains centered
Notice the wrinkles in front of Rory’s shirt. This is indication that the left (lead) side is in flexion. Extension (the right (trail) side movement) combined with flexion, knee flex under lead hip, and trail hip rotation lets Rory wind up his body into a coil; a very strong position in which to begin the down swing.
Rory has a late wrist break. This trend has become more and more common to promote more “lag” in the down swing to increase club head speed and distance.
P5: Transition
Transition is the simple process of moving from the back swing to the down swing. It’s somewhat of an intermediate step in which the body starts to uncoil. Essentially, though it looks like there is movement with the arms during transition, there actually is not. The arms and upper body are merely reacting to the movements of the lower body.
Here are some things to look at during this movement to attain the P5 position:
- Pressure is placed into the toe of lead foot
- The pelvis and chest are lowered decreasing the distance between the upper body and the ground; this move became known as the “Sam Snead Squat” and is incorporated into ever golf pro’s swing
- The arms remain where they were at the P4 position; they only give the illusion that they are being moved or forced downward
- Left (lead) shoulder points at the golf ball and has turned greater than 90 degrees
- The right (trail) hip has started to rotate back to the front of the body and the left (lead) hip has “bumped” forward as the left (lead) knee starts to straighten
- As always, the head remains centered
The transition is where many amateurs go wrong. Instead of starting the down swing with the lower body, they start by “throwing” their arms from the top of the P4 position. This is also known as casting. The body then reacts to the violently thrown motion of the arms and becomes out of sync with the arms. This leads to numerous down swing and impact issues.
P6: Last Parallel
With the lower body leading the way, the arms are now in a good position to start catching up. This is easy for the arms to do now since the arms move at approximately 30 miles per hours during the downswing, and the body only moves at 5 miles per hour.
Here are some things to look at during this movement to attain the P6 position:
- The club head starts to shallow. That is it starts to “flatten out” a bit and get a bit further behind the body
- The butt of the club is being “pulled down” to the ball and slightly to the right (for right handers) and left (for left handers) of the target
- The right (trail) wrist remains supinated as much as possible and the left (lead) wrist continues to be pronated
- The right (trail) elbow tucks into the right (trail) side and the right (trail) hand remains relatively close (within 4-5 inches) to the right (trail) side of the body
- The left (lead) shoulder continues its downward movement toward the ball
- The left (lead) hip is starting to “clear” out of the way to make room for the arms, shaft, and club head to travel
- And as always, the head remains centered and behind the ball
The last parallel position is an important checkpoint in the golf swing. When practicing stop your swing there and check to ensure you’ve reached this position correctly. If you haven’t, the results of the remainder of your swing is in jeopardy. Supination and pronation of the wrists are somewhat complex subject to discuss here, but a full explanation and illustration can be found at this link.
P7: Impact
The two big things that are happening in this movement and at this position is that the right (trail) wrist angle has fully released (this is also known as releasing the lag) and the face angle of the club has closed due to left (lead) wrist supination.
Here are some things to look at during this movement to attain the P7 position:
- The left (lead) hip continues to rotate behind the body
- The right (trail) foot is pushing forward and coming off the ground while the left (lead) foot is pushing back and onto the heel
- Almost all of Rory’s weight has been transferred to his left (lead) side; in addition his left (lead) shoulder, his belt buckle, and his hands are all ahead of the ball
- And as always, the head remains centered and behind the ball
Rory is also starting to “cover” the ball with his right (trail) shoulder, while his right (trail) elbow is tucked against his body. The low point of Rory’s swing has not quite been reached here. That will be reached slightly ahead of the ball promoting a divot after impact.
P8: Straight Line Release
From P7 to P8 the club head is thrust forward directly toward the target.
Here are some things to look at during this movement to attain the P8 position:
- The left (lead) hip remains level and continues to rotate behind the body
- The right (trail) foot continues pushing forward and coming off the ground while the left (lead) foot continues to push back and onto the heel
- Rory’s arms have straightened and the butt of the club is away from the body; this is a move common to low handicap players
- Rory has maintained his posture through this position and his belt bucket continues to point down and at the moving club head
- If you look closely, you’ll see Rory’s “low point” to be a few inches in front of the ball; this results in a divot.
- And as always, the head remains centered and behind the ball … this seems to be a common theme … 🙂
P9: Follow Through
From P8 to P9 the club head continues to be thrust forward up and to the left of his body.
Here are some things to look at during this movement to attain the P9 position:
- The left (lead) hip continues to rotate behind the body
- The right (trail) foot continues pushing forward and coming off the ground while the left (lead) foot continues to push back and onto the heel
- Rory’s arms have remained straightened and the butt of the club continues to be away from the body
- Rory has maintained his posture through this position and his belt bucket is starting to rise up and extend along with his chest
- His lead shoulder is pulling up and back and his trail shoulder has now completely covered where the ball was at impact
- And as always, the head remains centered and behind the ball
P10: Finish
From P9 to P10 all of Rory’s body parts continue to move and rotate. He finishes with his chest a bit back over his left side and pointing at the target. He is in perfect balance with his weight over his left side. He is balanced on his right toe and the sole of his right shoe is facing backwards from the target. Notice how Rory’s right side is bending at the finish; an indicator that he has not over rotated and that all his body parts are in sync and in balance.
If you can attain this finish position you’ve most likely hit all 9 previous positions. If you are not in perfect balance, something went wrong. It’s a good practice exercise to finish at P10 and then slowly move backwards to P6 and then slowly forward from P6 to P10 to finish in balance.